November 12, 2017

We built this cockpit awning for our sailboat...need shade from the Mexican sun

   Jessica and I recently sailed from our home port of San Diego down to La Paz, Mexico.

In our 30 foot boat, this voyage took us 3 weeks, but it was well worth the effort.
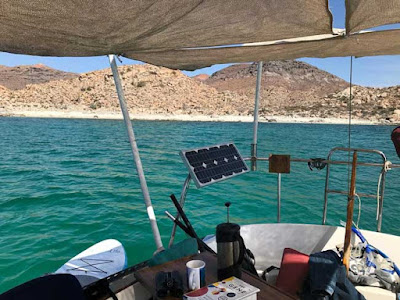
sailboat cockpit awning
2018 Update: our sun canopy in all its glory in the Sea of Cortez


Before departing, we had a lot of things on our 'to do' list. One of these things was to acquire some canopy shade across the cockpit of our Newport 30 boat. 

Mexico has a lot of sun and we only want some of that sun hitting us.

We built our own custom sun shade and it worked out great. I thought this would be of interest to others, so I'm describing the steps we took below.


sun awning
Jess enjoying a shady cockpit.


Our sailboat cockpit awning was not designed to withstand heavy conditions. We will only keep it up when travelling in light air or when the boat is at rest. Aside from that - the PVC poles and canopy will stow easily down below.

I like a wide open cockpit with unobstructed visibility, so I wanted a sun canopy that could be easily taken down at a moment's notice.


All in, we spent about $120.00 and the construction can be done in a couple of days.


sailboat bimini
our 2-panel sun canopy system 


Build your own sailboat cockpit awning

As you can see, we went with a basic 2-panel system. This way we have a back panel to shade the crew sitting in the cockpit. This back panel will be in place whether the main sail is up or down.

Then the front panel will only be up when the main sail is down (the front panel rests across the boom).


custom sun canopy
Front corners attach with a bungee for easy release.

Here, you can see the front panel rests across the boom. We use a bungee to fasten down the front corners. These can be popped off quickly.

When we cut the sun shade fabric to size and when we set the height of the PVC poles, we wanted to maximize visibility from the cockpit. This allows us to see incoming boats - and at the same time, it keeps the strong Mexican sun out of the cockpit.

We picked up our UV resistant canvas on Amazon. We bought 2 of those canvas packages, each one is 60 inches long and 36 inches wide.


DIY boat canopy
UV resistant canopy material with compatible plastic grommets


We also got a bag of the plastic grommets seen in the photo above. With a hammer, you punch them together with the fabric in the middle, this creates an eye-hole. You can then buy some parachute cord and tension all the corners.


Below is the version of marine canvas we used.


4 PVC poles (1 inch) cut to length 

PVC pipes support our sun shade canopy


We bought 4 sections of 10 feet long and 1 inch diameter PVC pipe at the hardware store. The 1 inch diameter give the right amount of flex - but is still rigid enough to stand straight under gentle tension.

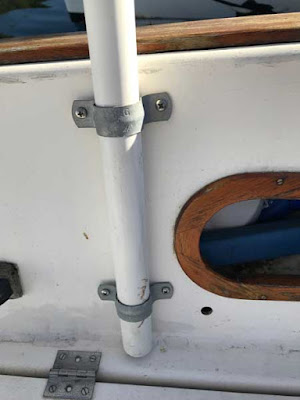
We cut all 4 poles to proper length. The front 2 pipes mount on the inside of the cockpit. We attached them to the inside of the cockpit with pipe fasteners. The fasteners were raised from the surface with plastic spacers, this allows the PVC pipes to be pulled out easily when the sun canopy stows away. These PVC poles cut easily with a hacksaw.


DIY awning
front poles attach with a pair of pipe fasteners


The 2 pipes mounted on the stern rest in fishing pole holders. These fishing pole holders mount directly on my stern rail.

stern PVC poles fit perfectly in a stern rail mounted fishing pole holder

We bought some stainless eye hooks with threading on one end. Then we drilled these through the top of the PVC pipe. This allows us to tension the parachute cord that is connected to the canopy eye grommets.

an eye hook drilled through top of PVC pipe

A small design challenge: we wanted the canvas material to wrap around the boom lift line and the back stay. We cut open a slit on both panels to allow the canvas material to wrap around these lines. Then we popped grommet eye holes along the slit, so we could tension them back up around the backstay and boom lift.

canvas dodger
top view of 2 part sun canopy
So, that is it. We feel very good about this. 

Like I said, it is not meant for heavy weather, but this sailboat cockpit awning will certainly keep the sun at bay while cracking beers after a long day cruising.

September 27, 2017

Starting to prep for a Mexico adventure...

Well, it is officially official - Jessica and I are taking the boat south to Mexico.

The plan is to depart from San Diego in December and head down the Pacific side of Baja - hopefully arriving in La Paz in the first or second week of January. I will be cancelling my mooring at Marina Villiage in Mission Bay, San Diego. So, this is the end of an era...

The Alize' has had a great home at Marina Village and I recommend the marina to anyone in San Diego - but all good things must pass.

My boat is old but she still has one last wild adventure left in her. We are still uncertain with the long term plan, but I would like to keep the Alize' on an anchor or else a mooring ball in either La Paz or Puerto Escondido - possibly for a full year. Jess and I will continue working in San Diego, but we can drive down and island hop in the Sea of Cortez when we get long weekends off...

I still have a long list of items I need to purchase in order to make this trip a reality. However, we just checked one item off the list last week. Jess and I picked up a very fancy solar generator from a company called Kalisaya. The unit we have is the larger unit called a Kalipak 601. It has a large lithium ion battery and is set up to charge many USB devices and 12 volt components. Here is the solar powered generator on the bow of my boat.

solar generator on a boat


That is a foldable 40 watt panel - that can be used to top off the lithium battery. We will use the panel to keep the battery charged as we are anchored out for long periods of time. Our thinking is that - this is a nice system to compliment the 20 watt panel that is topping off our battery bank.

I'll write more as we continue prepping for the Baja cruise...


September 7, 2017

Smoke emitting from the engine...

My Yanmar diesel has been very good to me. Knock on wood...

I have been in more than a few tight situations and this engine has saved the day.
And now it looks as though my Yanmar is in need of some love.

Jess and I took the boat out last weekend and started smelling smoke after about 10 minutes under engine power.

When I removed the engine hatch, I saw black smoke rising out of the mixing elbow. Here is an image of the front end of my 2GM20 diesel.


credit: PHGCOM [GFDL, CC-BY-SA-3.

The mixing elbow is just out of view, but it sits on the top left corner of this photo. This component looks like hell, very rusted out... But it always has looked bad. Now it is also smoking when I bring the engine up to max RPM.
I will keep you posted - I am hoping this is a reasonable job in terms of price and effort...

July 12, 2017

Social stratification at Two Harbors on Catalina Island

 Let me begin this article by stating that I adore Catalina Island and I especially love the Two Harbors area on the northeast side of the island.

I always will.

I grew up in southern California and now own an old, yet sea-worthy, Newport 30 sailboat. I am doubly blessed in that each year, I make the 76 nautical mile crossing from San Diego to Two Harbors.

Boat routes from LA to Two Harbors and Avalon on Catalina Island


Set off-shore of the crowded and crazy land of southern California, Two Harbors is a quiet, sleepy refuge. It is beloved by visitors because it has no pretensions, it is relatively affordable to visit and it maintains a salty, sea-faring feel.

Boaters can grab a mooring ball in the harbor. If you don't have a boat, you can take the day ferry in from LA. There are some campgrounds and a few simple options for room and board.

Sleepy and scenic Two Harbors, the gem of southern California.


There is not much happening at Two Harbors and that's what's so special about it. You can sip a beer on the patio of the Harbor Reef bar, you can paddle around or snorkel...and that's about it.

It is an honor to visit this gorgeous harbor. I hope future generations can experience Two Harbors as I have done.

Unfortunately, it is now changing in a manner that caters more to the upper class.


For better or worse, the Catalina Island Company owns all operations at Two Harbors in Catalina Island.

In recent years, this organization has been ramping up their efforts to commercialize and monetize their significant holdings on Catalina island. They have installed zip lines and added spas and resorts in the Descanso and Avalon part of the island. Opinions vary on whether this is good or bad for the island.

This year, the Catalina Island company is focusing it's 're-vitalization' efforts at sleepy Two Harbors.

The Catalina Island Co. has recently installed a new oceanfront at Two Harbors called, 'Harbor Sands'. This includes 6 cabanas, a bar, lots of lounge chairs and 1,900 tons of imported white sands.

Sounds innocent enough? Actually, it sucks and it introduces a toxic, divisive element to the harbor.

two harbors
The new Harbor Sands resort at Two Harbors.

The new 'Harbor Sands' dominates the coastline northwest of the pier and it is very much, Pay to Play.

The whole area is gated off and if you want to walk upon their imported white sand, be prepared to pay 300$ to rent a cabana or 60$ to rent chaise lounges.

These were the prices I saw during the first week of July. See photo below.

harbor sands


Keep in mind, up till a few months ago, all this coastline was open to the public. For many decades, families have been using this space to BBQ food and enjoy the scenic waterfront. It was free to use for all visitors. Now it is off limit to everyone except those paying through the nose to rent chairs, palapas and order over-priced drinks.

harbor sands at two harbors
6 picnic benches remain for those that don't want to play the Harbor Sands game.

new changes at two harbors
Public space on the left, gated off Harbor Sands on the right.


I just sailed out to Two Harbors in early July, I picked up a mooring ball in and spent a week in the area. I was mostly preoccupied with a new energy system, I picked up a power generator that runs off of solar power. This is an interesting complement to the 12 volt DC power system on most boats.. ...but I digress...

Here is what I observed within the Two Harbors community...

All the Two Harbors locals I spoke with are vehemently against the invasive Harbor Sands. I also failed to find one boater who likes Harbor Sands. Instead, all the stories I heard were about long-time visitors being angered by the invasive new development.


Now let me wrap this up by re-stating how much I adore Catalina Island and Two Harbors. I am writing this article as an expression of tough love for the island.


I don't want to see the public waterfront encroached upon. I hate the idea of the middle class having to peer in across the rope-line to see how good the upper class has it.

If island visitors want a super-fancy 'elite' Catalina Island experience, they already have Descanso.

There is no need to introduce such flagrant social stratification onto the sleepy coastline of Two Harbors.

I am hoping the Catalina Island Company will make better decisions in the future. 


May 5, 2017

Another successful Dog-Sail


Our dogs are about 1.5 years old now and they are just starting to get their sea legs.

They've grown into their doggie life vests and they're almost making it through an afternoon sail without becoming nauseous.

Baja sniffing out an incoming breeze.


 Baja, the brown dog, is a high anxiety pup. She is keenly aware of the world and remains vigilant against every sound and smell. The ocean keeps her on her toes.


not a normal expression for Baja

Here's Jessica and Baja.

Baja looks like a drunk old man in this photo. That's not what she normally looks like... The open Seas brings out something new in her...

Glacier...always comfortable in the world.

Glacier is our white, fuzzy dog.

She is always in a good mood, regardless of the circumstances. Lots of smiles with this one, even when she is mildly puking in the corner of the cockpit.


Jess and Glacier watch the sun dip into the Pacific


The sun sets  -  marking the end of another classic dog-sail.

April 4, 2017

Thresher shark caught off of Mission Bay

My friends and I had a high school reunion this past weekend. I anchored my sailboat out in Mariner's Cove in west Mission Bay.

We were prepared for a casual day of catching up, drinking beer and eating tacos. But, as fate would have it - a thresher shark stole the show.

One of my old high school friends is an expert fishermen - and he hooked into this full grown thresher. The population numbers for this species of shark are quite healthy and so - the regulations allow for 2 thresher sharks per day.


This shark will be feeding many people. We filleted out the meat, partitioned it out, bagged it and froze it.


We ended up spending most of the afternoon processing the fish meat.


Nothing was wasted...

Now comes the fun part... learning about the best manner to prepare thresher shark meat..
Thresher vindaloo?

February 6, 2017

Solid winds and classic northwest swells hit the San Diego coastline


This winter has been good for southern California.

Mostly in terms of rain...

We are not out of the woods yet, but the precipitation has been steady for a few months now. In fact it's raining as I write..

Storms up in the Pacific Northwest have been sending us steady swells and various low pressure systems have delivered many days with 10-20 knot winds.

In general, work has been keeping me busy, but we did manage to get offshore last week...

Chris and his wife came down and got to see what San Diego looks like when you're 5 miles offshore.


January 22, 2017

I'm trying out a fancy new sensor bilge switch

Greeting skippers,

Here we are in the dog days of winter. Rain is falling heavy on the shoreline of southern California. The ocean is a chaotic mess of wind and angry swell. I for one could not be happier. The reservoirs are filling up!

But there's not a lot of sailing going on... So, in the interest of keeping busy, I've taken it upon myself to replace my bilge system. Usually I go with the classic float style switch, but this time - I decided to go with a fancy new electronic sensor switch. I got a Water Witch electronic sensor.

I went with a pretty standard pump. A West Marine 800gph pump. Apparently, these go out every 3 years or so. I just hit year 3 and sure enough...it crapped out.

So anyway, I wired up this new setup last month and its working great so far.

There are some advantages to this system, so I thought I would share my thoughts.


install electronic bilge switch
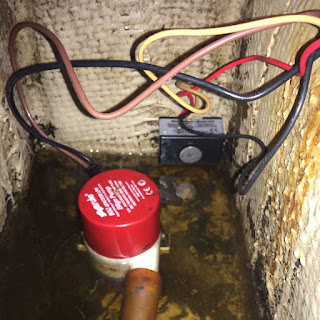
My filthy bilge with a new pump and a new sensor (black box in the back)


Here you can see I just put in the new West Marine 800gallons/hour pump. Normally, I have a float switch adjacent to the pump. When the water in the bilge rises, the plastic float arm rises also and this triggers a signal to turn on the pump. The problem was, my bilge is a bit too narrow. The arm of the float often touched the walls of the bilge as it was moving up or down. This made for an inconsistent system, as the float sometimes snagged and couldn't rise.

So, this is why I decided to opt for this new, smaller electronic sensor.

I bought a Water Witch electronic sensor - the Model 101 (12V DC). I found one at Marine exchange in San Diego for about 40$. There are no moving pieces.
Water witch electronic bilge sensor


When the water hits the large metal disc (see photo) then the signal triggers and the bilge activates.

What is cool about this type of sensor, is you can install it wherever you want (any height and any spot in your bilge). In a restricted bilge space, it is nice to have options.

Apparently you need to clean the metal disc from time to time. (If the disc is too dirty - a current won't go through). Although, this hasn't been an issue thus far.


electronic sensor bilge
heat shrink wire butt connectors

Oh and another thing... I finally did my wiring the correct way. I used these heat shrink butt connectors. In a bilge, any amount of exposed copper wiring will rot out quickly. These heat shrink deals are the best way to keep your wires from rusting out. Definitely worth the extra dollar.


October 31, 2016

How to replace a propeller on a sailboat

I've neglected my propeller for many years.

I replaced my zinc anodes- but not as often as recommended. I probably put new zincs on every 6 months - but every 3 months would have been better. 

Each time I've dove under my boat, I've seen more oxidation and more corrosion building up on my prop.

It was time to replace the propeller...

how to replace a sailboat propeller

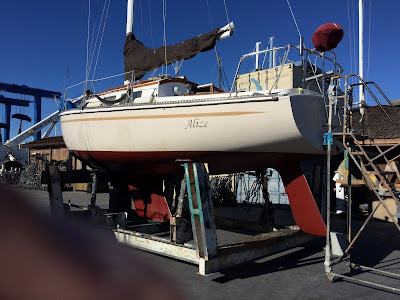
I hauled out this week in Shelter Island Boat Yard in San Diego. This is a good yard with a reasonable haul out package deal. I let them do the prep work and paint this time.

However - replacing the propeller was a separate process. A marine surveyor working out of the shipyard named Ken Closs helped me with the following propeller replacement.

Here's a step by step instructional on...


How to put a new propeller on a boat.


propellers for sailboat
my three sons

1. Decide when its time for a new propeller.


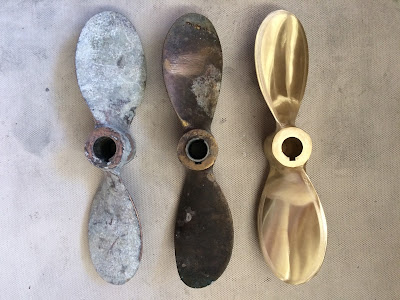
In the photo above, I have arranged my propellers in order of disintegration.

On the far left is the prop that has been pushing me through the water for the past decade. It is ready to retire. In the middle is my secondary (emergency) prop, it is not quite as oxidized, but the blades are bent from hitting a rock. On the far right, is my brand new propeller. 

As you can see, these are all Michigan 2-blade sailor propellers. This is a popular brand for sailboats.

On my 30 foot Newport 30 from 1976, I use a 12 inch diameter, 11 inch pitch propeller. My shaft bore is 7/8 inch.


In the photo below, you can see that the corrosion on my old propeller has caused the edge of the blades to break off.

replacing an old propeller
looks like a mouse chewed on my blades

 How do you know if your propeller had oxidized?

If you scratch your prop blade with sandpaper, and you see pinkish bronze under the surface rust - then it is time to replace your prop.  If it's still good, you will see golden bronze upon scratching.

oxidized propeller
an old propeller, that has not yet oxidized fully

In the photo above, you can see that my secondary propeller has not yet past the point of no return, in terms of oxidation. When I scratched it with a heavy grit sandpaper, I found fresh copper metal. There was no pinkish tone, therefore in regards to oxidation I am still good. However, this prop has already hit a rock - and so the blades are bent out and the bent region shows cracking. For this reason, it was not worth restoring.

Another way to assess a propeller's oxidation  - is the ring tone. When you hit a good propeller with another metal object, there should be a resonating tone, like a bell.

If the prop is oxidized, then there will be a dull, brief tone - with no resonance.

2. Buy a new propeller


So - it was time for me to buy a new prop.

My brand new prop (below) set me back 550.00. I ordered it from Wilmington Propeller in Los Angeles. Other good west coast retail prop suppliers are: Tacoma Propeller in WA and Pacific Propeller in San Diego. Be prepared, if the retailers don't have what you need in stock, you will need to put in a order through Michigan Sailor. This could take 6-8 weeks. Plan this out before you haul your boat into the shipyard.

how to install a new propeller on a sailboat
new prop, 2 nuts and a key

3. Removing your old propeller


So, when you pull off your old propeller, first you will pull out the cotter pin at the end of your prop.
Just snap it in half, you'll put a new one on soon.

Then you should unscrew 2 nuts (1 large and 1 small). This may take some coaxing. Get a big wrench and tap it with a mallet.

Once the nuts are off - you can slide the propeller down the shaft.

There is also a special propeller puller tool that helps with this process.

Once the propeller is removed, you will see there is a slim metal object holding the prop against your shaft, this is called a propeller key.

You can see my 2 nuts and prop key in the photo above. Hold onto all these items, you need them once you put on your new propeller.

4. Once your prop is removed, clean up your shaft, nuts, prop key. 


In the photo below you can see my propeller shaft all cleaned up. On the top of the threading area, you can see the groove that the propeller key slides into. There is a similar groove on the propeller. The prop key works like a joint to hold the propeller in place around the shaft. This prevents the prop from spinning independent of the shaft. At this point, make sure to clean up this groove and your prop key.


install boat propeller
all cleaned up, ready for a new prop
Okay - slide that new, shiny propeller onto your shaft.

putting on a new propeller


5. Fit the new propeller on the shaft with the propeller key


A good fitting propeller should land on your shaft with a satisfying thud. That means the bore diameter is a good, snug fit. Use a pen or a knife edge to mark the spot up on the shaft where the prop naturally slides up to. (prop shafts are tapered).

Now, pull off the prop, and put your prop key into the groove on the shaft. It should fit in easily. Then slide the prop on top, over the key. You want the propeller to slide into place at the same place it landed without the prop key. In this manner, it should still line up with the first mark you made.

This is how you make sure you have your propeller and propeller key at their ideal spot on your shaft.

bronze propeller for sailboats
lining up the prop with prop key
 In photo above - you can see the front (fore) of my propeller with the prop key snugged in on the shaft. 

tightening the nuts

6. Tighten the propeller nuts


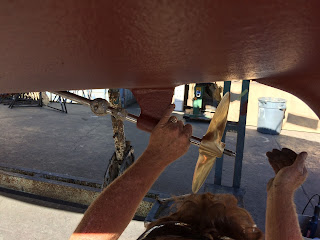
Place your small nut on first. Hand tighten, then use a large wrench for tension. You can place a large wooden block between the prop blades and the hull of the boat - to keep the shaft from spinning as you tension the prop. Once the smaller nut is secure, tighten the second (larger) one on behind it. The larger nut takes more of the load. Tension it the same way. 

It should be noted that schools of thought differ in regards to whether the thin nut should be placed on first or second. I have heard passionate and convincing opinions on both theories (thin nut first or thin nut second..). For more on this subject, you can read this article from Bolt Science.

put in a new cotter pin

7. Insert the cotter pin


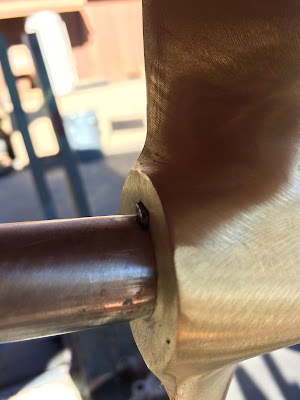
Get yourself a fresh cotter pin. There should be a cotter pin hole at the end your shaft. With pliers, bend out the pin around itself. This prevents the nuts from sliding off.

the finished product


Now just trim the ends of the cotter pin and Voila - you are done. 

Splash the boat back in the water and fire up the engine.

If you've done this correctly - your boat should move forward as you increase the throttle.
If it doesn't - haul it back out and try again....

Good luck and let me know if this was helpful in the comments section below...

Captain Curran -


October 17, 2016

Getting the remains of these northwest storms down in San Diego

Summer is over in San Diego.

This really doesn't mean too much - as we don't have actual seasons down here. We have fake seasons.

The air is still warm - most days are mid-70s. Rain is few and far between.
We don't have many deciduous trees, so there are no autumn colors out.

But... we do start picking up wind from the huge low pressure storms that batter the Pacific Northwest.


Jessica at the helm of our Newport 30


This past weekend, Jessica and I pushed my trusty Newport 30 into some 17 knot/hour winds. We exited Mission Bay and sailed along the coast of Point Loma.

The swell was about 4-5 feet out of the northwest. This made for a bumpy ride but a 17 knot breeze kept us moving pretty well though the trough.


the ocean always looks flat in these photos...

 In a few days, we should get the wind front from the most recent storm that just hit the Oregon coast. I am referring to the storm that caused this water spout near Manzanita, OR.

 I am looking forward to that wind...

In general, we are a bit wind starved in San Diego. Our coastline is buffered from the inward slant of the shoreline - any by the presence of the Channel Islands. So what we experience near shore in San Diego is always a fraction of the sea conditions on the windward side of Catalina Island.


Still, I am not complaining. Anytime San Diego gets 15-17 knot winds, you need to be grateful and get out there and enjoy it..


Fair winds!

August 25, 2016

Took my girlfriend's parents out for a sail.

Jessica's parents finally made it down for a sail in San Diego.

They live in Phoenix and are generally in need of a break from the brutal heat in Arizona.

San Diego delivered.

We had great cloud cover and comfortably warm air. These are my favorite boating conditions. Plus there were steady 10-15 knot winds all afternoon.

Nothing much more to report. Just a great day out at sea with my lady's folks.


July 14, 2016

To varnish or not to varnish? Short answer...don't varnish.

How is the wood looking on the outside of your boat??

Time for a touch up?

Yeah, I know how that goes...I just went through this process on my Newport 30. I had friends trying to convince me to varnish my wood trim - but I resisted.

In fact, there comes a time in every boaters life when they need to decide between cetol or varnish.

I have put a lot of thought into this question...and I have an answer.

Cetol

My reasoning is simple.

Time has value.

That's the most succinct way to put it...

I use a cetol finish on my external wood because I want to spend my time out sailing in the open ocean as opposed to in harbor re-applying varnish.

This past week, I sanded down all my teak trim, cleaned it up and then applied 4 coats of sikkens cetol marine natural teak. It looks perfectly fine.

Below I will review the process of applying cetol.


apply cetol on a boat
Final product - a few days after 4 coats of cetol marine natural teak

The photo above I took 2-3 days after the final coat, so the cetol is more or less cured. I cleaned up the deck and sprayed it down with water before this photo.


cetol marine natural teak reviews
my forward hatch right after 4 coats of sikkens cetol marine natural teak
This photo above was just after the last coat of cetol. It is still tacky and wet looking.


Now, keep in mind, I am not a perfectionist. But, to my eye, this looks almost as nice as varnish.

Here's the trade-off.

Pros:
  • Cetol is easier to apply than varnish (put on 3-4 coats, no work in between coats)
  • It's easier to remove than varnish
  • It lasts 2-3 years before you need to re-touch (varnish lasts 6-12 months)
Cons:
  • in general, varnish has a deeper and richer look vs. cetol
  • some people complain about the slightly orange color in cetol

So, here's the story with the color...


Cetol is a durable satin, translucent protective wood finish (that's their wording). Historically, the major complaint with cetol is that - it has a slight orange hue. That is certainly the case with Cetol Marine, their first product. Apparently, it's the orange pigments in the finish that allow the Cetol to defend against the UV rays in the sun.

In response to outrage from boaters - the Cetol folks made a new product, the 'marine natural teak'.

They turned down the orange in the 'marine natural teak'. Somehow, with the natural teak version, they've managed to maintain good sun protection without the orange color.

To my eye, the color in the 'natural teak' version is perfectly normal for treated wood.

If the color of my wood in these 'after' photos makes your stomach turn, then go buy yourself some real varnish and get to work!

If you don't mind the color, then go get yourself some cetol. I use about 2 quarts on my boat. That amount allows me to put 4 layers on all the wood trim you see in these photos.

West Marine will sell you a quart for about 50$ (yeah, not cheap...)

However, you can usually find the same quart of cetol on Amazon for a better price.


cetol marine
The hatch and cockpit teak with 4 coats of cetol natural

In this photo, the hatch and cockpit teak are finished (4 coats), but the hand rails are still raw teak.

Okay, if you're interested - I will walk you though my recent teak project - step by step.

Here are my 'Before' photos...


sikkens cetol natural teak
out sailing, ignoring my crappy woodwork

Here I am - doing what I do - out sailing. If you look close, you can see that the external teak trim on my Newport 30 sailboat is looking a little ragged. I will be generous and say, its been about 4 years since I have done much of anything with my teak. 

Let's just say, my teak had degraded to the point where my marina friends regularly gave me a hard time over it. That's usually my cue to get to work.

cetol natural
the shameful condition of my teak
Since the time I bought my boat, I have never sanded the teak all the way down to clean wood. In the past, I've just lightly sanded and then loaded up on Cetol. So, my wood has always looked patchy and there's been dark water stains throughout. So, this time I decided to do it right.

I should mention that the peeling finish in the photo above is the cetol natural teak finish that I applied about 4 years ago. So, you can see it is already separating from the wood, this made the sanding a bit easier.


cetol marine finish
cleaning up the bare teak with 80 grit
I used an electric hand sander where I could - and then just sanded manually with bare hands in the hard to reach spots. I recommend only using high quality 80 grit paper. Anything else just binds up with oils and dust and becomes useless. Don't skimp on the sandpaper, get the good stuff. 3M makes good sandpaper.

sandpaper teak
shaving it down to bare, clean teak
This was a very dirty week. I recommend really trying to keep the wood dust from entering the inside of your boat. Really focus on that... It's a mess once its inside.

I spent 3-4 days sanding down my wood. My girlfriend, bless her heart, came down to help out.

teak varnish reviews
Jessica sanding down the hand rails


This piece of teak in the cockpit was finally starting to look nice. Apparently, my teak has a light golden color once it's properly sanded down. After removing stains with 80 grit, I moved on to 150 grit, to smooth things out and close up the pores.


Is cetol better than varnish?

 I have never seen my forward hatch look this nice. I had to take this photo, because I know this won't last.


cetol vs varnish
forward hatch cleaned up to bare teak
Alright, so I removed the dust and prepped the wood for finish. For this, I used a couple rags and acetone. I first tried paint thinner (since it is less harsh on the fiberglass), however the thinner takes too long to dry. Acetone vaporizes in 10 minutes, so I went with that.

I taped off with the blue 3M tape. 3M says you can leave this tape on for 14 days and still pull it off clean. I wouldn't wait that long. After 1 week, it is anyone's bet. I left this tape on for 3-4 days in the hot sun, and it still came off easy.


cetol marine teak
all prepped up

Here, I have applied 2 coat of cetol marine natural teak on the teak panel on the right. The trim on the left still remains raw.


cetol natural teak
a close up comparing 2 coats of cetol vs. nothing
Here's a link to this stuff on Amazon.


At this point in the week, Jessica became bored with the project. Here she is at the marina, playing with the dogs. You can see that Glacier (the white one) can barely contain her excitement over getting a treat. They were having much more fun that I was.


dogs on a sailboat
Glacier very excited for food


Okay - many days later, I am done with the project. I have now applied 4 coats of cetol on all the wood.

If the sun is shining, you can easily do 2 coats in 1 day. I wait till the bottom layer is no longer tacky, then start the second coat. I should mention that I used foam brushes for this project. Personally, I think they are easier to handle/control than hair brushes.

So, I think it looks great. I have had at least one professional boat-yard guy stop by and compliment me on my varnish. He was impressed to hear it was actually cetol, because he is well aware how much more work is required to actually apply varnish.

Here's a few more finished teak photos.

I will load a few more photos up tomorrow, now that the whole boat is done and cleaned up.

Final pictures after 4 coats of sikkens cetol marine natural teak


marine cetol

sikkens cetol teak
big improvement in the cockpit

handrails sailboat
handrails looking nice!


Cetol Marine Natural Teak Reviews


I'm looking at the wind report and seeing 10-15 knots this weekend. I'm planning to raise sails this Saturday and head into the Pacific Ocean...

It's like the old saying...

'Varnish is for people who love boats, cetol is for people who love sailing.'


It should be noted that I owe much of my familiarity with boat maintenance to Don Casey's classic book, This Old Boat.
This is a broadly respected, definitive text that has brought many novice boaters into the world of proper boat care. There's a nice section on wood work and teak maintenance. Also, if you are emphatic about putting varnish on your boat, this article provides some good insight.

Truth be told, I didn't know much of anything when I bought this old Newport 30. I slowly brought it back to life and it's given me 8 great years. Let's hope I see another ten years from this vessel. Lord knows I wouldn't get much if I sell it...